Data to Insight is not a software supplier in the traditional sense -- we're here to help local authority (LA) colleagues get work done and share it with each other. The best thing about Data to Insight is the community of analysts who are doing and sharing great work through this network.
We recognise that different LAs want different levels of engagement with our work. As such, we offer four key collaboration approaches to suit different users’ information needs.

Using Github and Replit
To write rules for the validation tools, and to contribute to the D2I codebase, you need to know how to get code out of GitHub and into your development environment, how to make changes, and how to get it back to the Github. In this tutorial you'll learn how to do this by adding you name and LA to a dictionary stored on the D2I Github.
You'll need to make an account to use both Github and Repl.it. The easiest way to do this is to make a Github account, and then, on Repl.it, use that to sign in.

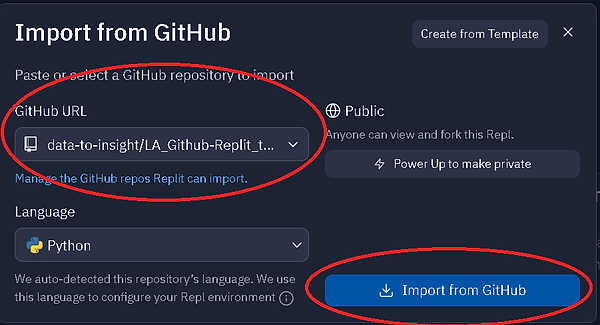
Once you've signed in, you'll want to create a Repl, this is a a file, or set of files, you can write code in on Repl.it. To do this, click the create button shown in the image below. Then, to start making changes to, or adding to, code on the D2I Github, click on the import from Github button.

From here, copy/paste the URL linking to the D2I Github repo of your choice into the Github URL box. For this exercise, use the url for the Github-Replit tutorial:
https://github.com/data-to-insight/LA_Github-Replit_tutorial
Following this, click import from Github.
The next page may take a little while to import and load, depending on your internet. Once it's loaded you should see a list of the files in from the Github repo, but in an environment you can code them. Now to complete the main task: navigate to the users.py file and add a line to the users dictionary with your name as the key and your LA as the value. For this tutorial, I'll add a fake analyst to the list.

In the image above you can see the file you need to navigate to circled, and the dictionary you need to enter your name and LA into circled as well. In the image below, you can see that I've added the user Fake Analyst as a key to the dictionary, with the value Imaginary LA

Once you've done this, hit the big run button at the top of the page to check you haven't broken the code and to see the dictionary of analysts and LAs print out. You should get an output that looks like the one in the image below, but hopefully with more names.

Having done this, you're ready to add your code to the Github. To do this, click the version control button in the sidebar, its on the far left in the image below. This may take some time to load. It will bring up a menu allowing you to add a branch, write a comment explaining what you've done, and commit and push. Next, add a branch using the + button and name it something suitable.

Next, write a comment in the comments box, and commit and push. This will push your code, in its branch to the Github, and the Github will receive a pull request.

From here you can click compare and pull request to make a pull request. WHen you do this, you'll be redirected to a new page asking you to add a name and description to the pull request. When you're ready, you can click the create pull request button.

Once you've done this, a pull request will appear, letting your code to be checked to see if it can join the main code by a reviewer. It'll be reviewed, and comments may be attached asking you to fix things before its merged, but, once it has no mistakes and is ready to be merged, it'll join the main code base.

Once your code has been merged, you can go back to the main branch, and select the file users.py and you'll see your name and LA added to the dictionary, just like the example below.
