Data to Insight is not a software supplier in the traditional sense -- we're here to help local authority (LA) colleagues get work done and share it with each other. The best thing about Data to Insight is the community of analysts who are doing and sharing great work through this network.
We recognise that different LAs want different levels of engagement with our work. As such, we offer four key collaboration approaches to suit different users’ information needs.

How to use Jupyter Notebooks
The Jupyter Notebook tools and the worksheets and learning versions of the tools require you to be able to both have Jupyter Notebooks, and be able to use it. This guide is not about how to get access to Python and Jupyter Notebooks in an LA, it's how to start using the tools and Notebooks when you do have it.

Basic Jupyter Notebooks
The aim of this guide is to explain the basics of working within Jupyter. If you already have some Python experience, that should be enough to start using our Python worksheets and the dev versions of our tools. If you don't have any or much Python experience, it should be enough to get you started on using the usability versions of our tools. For a lot of people, Jupyter Notebooks are not where they learn Python for the first time, so moving from a scripting focussed environment, particularly one with a shell, can be a bit confusing. If none of that made sense, don't worry though, for this guide, it doesn't have to.
For this guide, we'll go through two things: opening Jupyter Notebooks and getting started on writing your own code, and getting Notebooks from the web, such as the D2I website or D2I Github, and getting them running in Jupyter notebooks. The guide will finish with you opening the 'Day to day Children's Services Python worksheet' in your own Notebook environment so you can start learning if you feel ready.
First, lets get Jupyter Notebooks open. You can open it from the start menu, or, if you are using Anaconda, you can open it from there too. If opening via Anaconda, in the Home tab of Anaconda.Navigator, scroll down until you see the box for Jupyter and click the launch button. If, instead of a launch button, you see an install button, you will need to install Jupyter Notebooks, which may be something you need to discuss with your LA's IT department. Notebooks comes as standard in most distributions of Anaconda however, so for most people, this will not be an issue. It is also possible to use the Notebook tools and worksheets in Jupyter Labs, but this guide focusses on the Notebooks version of Jupyter.

Once you've launched Jupyter Notebooks, it should open in your browser after a short loading period.

In the image above, you'll see three things circled in red:
-
This is the url bar of the browser that Notebooks opens in. Note that is will probably say something along the lines of localhost:8888/tree. This is important, what this means is that, despite the Python environment opening in the browser, it is not actually running on the internet. Nothing you do and no data you use leaves your computer, so you don't need to have data safety concerns.
-
This is where you start a new notebook from. Click New, and then, in the dropdown, click Python 3. This will open a notebook in a new page in your browser. Do that so we can move on withe the guide.
-
When you've made some Notebooks, you can find them here. You'll notice that you make make folders to store notebooks, but you can also store the normal Notebook .ipynb files in the top directory too.
Click new and start a new Python 3 notebook, and navigate to the new tab it opens in.

If you navigate to the new tab, shown in red circle 1, you'll see a page that looks like this. Check the URL bar, it's still local host, so you don't need to worry about your data being online: it isn't. The second red circle, labelled 2, is the title of the notebook. If you click it, a prompt box will open allowing you to rename it. I renamed mine from Untitled-1 to How to use notebooks. Circled by 3 is the most important bit, the grey box is called a cell, and it's where we write our code.
It's important to talk a little about how Python code written in Jupyter Notebooks differs from Python written in other environments. The most common way to write Python, particularly for beginners, is to write scripts. These are bits of code that, when you run them, run all the way through, and produce outputs. Sometimes scripts might wait for user prompts and inputs but, largely, you run code, and the whole thing runs. Jupyter Notebooks are different. In Notebooks, you write bits of code in individual cells, and it allows you to run cells individually. What this means is that, whilst you're writing and testing code, you don't have to run it all from the beginning every time you want to test it. This is useful, for instance, if you're doing calculations or making visualisations, and you want to try a few options, one at a time, and running the whole code each time would take a long time. Cells also allow you to choose between writing code, or 'markdown'. Markdown is text that you can use to explain the code, how it works, and why. Of course, you could write your entire notebook code in one cell and run it like a script, but that misses the advantages of having the cell based format.
Let's look at writing some code. we'll do everyone's favourite first bit of code and print Hello World. To do this, write the Python to print Hello World in the first cell, and then click run. The code is the line: print("Hello World") This will print Hello world to the Notebook.

In the picture above, you can see the code in the first cell, and the print out of 'Hello World' that appears after the run button is hit. To run an individual cell, click it to select it, and click run. If the cell you run is the last cell in the Notebook, a new cell will appear. You can also insert a new cell anywhere by clicking on a cell above or below where you want a new one, then clicking the Insert button in the toolbar, and selecting above or below.
Recalling back to the discussion of how Jupyter works, once you've run a cell, any code in following cells can be run without re-running the first cell as the Notebook remembers any variables and outputs.


For instance, if in cell 1 you define the variable x = 1 and then run it, the notebook will know that x is 1, if you then write another cell using x, and run that cell without running the first cell again, it doesn't matter, the Notebook knows that x is 1, so if you write print(x) in the second cell and run it, independent of the first, it will work! You could then even delete print(x) and replace it with
print(x + 2), and it would print 3 to the notebook.
This can cause some issues though! The notebook will remember the output or value of a variable that it received last, not the value that comes before it in the code. For instance, in the example below, if you run the third cell, which sets x = 5, and then go back and run the second cell, the last value of x that the notebook has had was 5, so it will print 5!

This also means that if you run a number of cells in the Notebook and then start running earlier cells again, you can get some odd results. The same thing can happen if you re-run the same cell in some instances.


For instance, in the examples above, every time you run the second cell without re running the first cell, it takes the value of x you just generated, adds 1, and prints the new one.
So, what should we do then? Lots of times when we want to run our code, or test that it works, we will want to clear all the variables and outputs and start the code again from scratch. Luckily, notebooks has a way of doing this. There is a thing called the kernel that is the computational engine that runs Python, to put it the most simply, this is where variables and outputs are stored. If we restart the kernel, we refresh the Notebook, ready to go again. To do this, click the Kernel button in the toolbar and select Restart or Restart and Clear Output. Note: if you do this, you will not be able to run cells you have been running later in the Notebook until cells earlier in the notebook that they rely on have been run again, for instance, if you want to print x in cell 2, it won't work until you've defined x in an earlier cell.
Now you understand the basics of using the Jupyter Notebooks environment, we can move on to getting some code into the environment.

Getting tools and notebooks from Github
First things first, to access the tools that are stored on Github, you'll need to be a member of the D2I Github: Data to Insight Code Library (github.com). The best way to do that is to request membership via the Slack, or to email us. Once in full release, Notebook tools will be available on the D2I website, which will just require the normal membership used to access the Excel tools we offer, but pre-release and version controlled versions will be on the Github. Also, access to the Github allows you to contribute to the code base and the tools, fix bugs, and help us offer better tools as part of the collaborative community. If you make a tool you think is useful, we would love to add it to the collection of tools we're making available for LA analysts. The Jupyter tools can be found here: data-to-insight/D2I-Jupyter-Notebook-Tools: Python data tools created in Jupyter notebooks, examples and fully functional tools (github.com) . From this page, you'll see all of the Notebook tools available.

To practice, and to start your Python data analysis journey, let's get the Answers - Day to day Children's Services worksheet downloaded, and loaded in to Jupyter Notebooks. This is a complete bit of code that should run pretty easily, all you need to do is follow the instructions in the Notebook to download some publicly available data from the DfE, and then copy the location of that data on your own computer into the notebook.
First off, navigate to the file on Github, or, follow this link to the D2I Github. This will take you to the version of the notebook stored on Github, you'll notice it's formatted like the notebook. To download it to be opened in Jupyter Notebooks, click the Raw button (circled below).

Once you've done this, you'll be redirected to a new page of Raw code, it will look like a lot of text. Right click on the page in the middle of the text, and select 'save as' just as you would if you were downloading and saving a picture from a website. You'll see a box prompting you to name the file, name it as you want, but make sure you follow two key steps:
-
Click the 'save as type' dropdown and select 'all files', ensure you don't download it as a text document, or it won't work.
-
At the end of the file name, type .ipynb as the file extension, this ensures it downloads as a Jupyter Notebook.


Now you've downloaded the Notebook, navigate back to Jupyter Notebooks, click the upload button, right next to where you clicked new earlier to make a new file (circle 1 below), and select the notebook file you downloaded from wherever you saved it. From here, a blue button will pop up in the files (circle 2 below), to allow you to complete your upload. Click it and your upload will complete. Then, navigate to the new file you just uploaded and you should be greeted with the notebook with the answers to the Day to day Python worksheet. Don't worry that the answers are there, it won't hurt to glance at them before you try the worksheet properly.

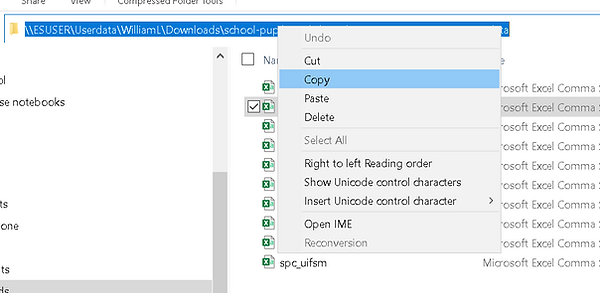
Once you've got to the notebook, if you read the markdown, you'll be prompted to download some data from the DfE. You can us this link to download the DfE data, it's the same link. Once you've downloaded it, navigate to the loaction of the zip file you downloaded in your file explorer and unzip it by double clicking it, then navigate to the folder entitled 'data'. Copy the data folder somewhere on your computer outside of the zipped file you got fromt he DfE. If it stays in the zipped file, the Notebook can't read it without some code changed. Now, navigate inside the 'data' folder. There will be a number of Excel files in here. Don't rename them. Instead, go to the navigation bar, and click it and highlight the file path taken to get to the Excel files, use ctrl+c on your keyboard to copy this filepath, or right click copy.
You'll now have the filepath saved to your clipboard, you'll need to input this into the code so that the Notebook knows where to look for the DfE data. Navigate to the cell seen in the image below and delete the highlighted text, then paste your filepath in there, ensuring you don't delete the quote marks or the r.
The finished code should look something like this:
os.chdir(r"YOUR FILEPATH HERE")
Once that's done, the whole notebook should be ready to be run. A few buttons to the right of the Run button is a button that looks like a fast-forward button, this is button restarts the kernel and runs all cells. If you've done everything right, if you hit this button and wait a few seconds and scroll down, you'll see some data printouts and some graphs. If you download and complete the Day to day Children's Services Python worksheet (not the answers version), this is what you'll learn to make.